 |
|
 |


 |
 |
ver 1.2 2004-05-15
By adicoto
|
Contents:
1. Introduction
2. Main window
3. Menus
4. Additional buttons
5. Subtitles window
6. Using Subtitles Translator
7. Tips and tricks
|

|
| 1. Introduction: |
Warning ! Subtitles Translator is not a subtitles translator. So, if we have established this we can talk about Subtitles Translator (ST). You canít find a magic button for translating the subtitle in your own language. You must do that with your brain. But youíll find that ST can help you a lot.
ST is a powerful tool for translating subtitles or building them from scratch. It uses the MicroDVD frame-based subtitles. Sorry, but you must have a MicroDVD subtitles for this program to work. Later we will elaborate the functions.
System requirements go like this: if you can play a movie on your computer then you meet the requirements. So, for a DivX or XviD movie you need 64 MB of RAM, a minimum 600 MHz CPU. And, of course, the required codecs. For an MPEG1 movie, a 166 MHz CPU with MMX and 32 MB of RAM is enough. ST uses Windows © Media Player 2, ver 6.4. If you canít play the movie with this program, you canít see it in the movie window.
|

|
| 2. Main window: |
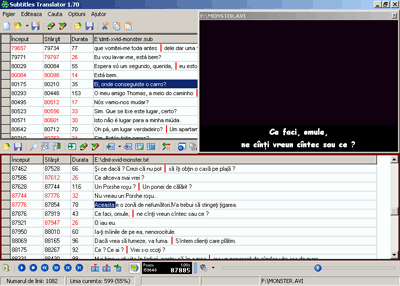
ST main window looks like this:
For now, the most important parts are the original subtitle part, the upper one, the translated subtitled part on the bottom and the movie window on the upper right. The movie window is resizable.
|

|
| 3. Menus: |
On the window we see the common menus : File, Edit, Search, Options, Help. Letí talk about them.- On the File menu we get the common functions, New, Open, Save, Load, used for projects and for individual files, and Exit.
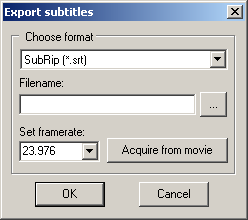
New added feature, Import subtitles/Export subtitles helps you to convert other format of subtitles (SubRip for now) into MicroDVD format.
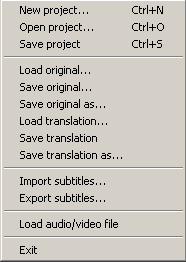
- New Project opens a dialog box, looking like this:
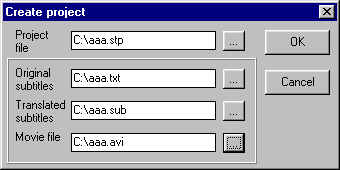
You must fill all the fields before you can go further. After pressing the OK button youíll find a file named (in this example) aaa.stp in the root of drive C. The file can be edited with a text editor. It contains information about files and their locations. If you load first the original subtitle, the movie and the target translated file when you select the Create Project option, the corresponding fields are filled. You must only fill the Project file field.
- Open Project opens a dialog box asking for a file with the stp extension, a ST Project file.
- Save Project save the project, meaning it saves also modifications that you have made to the files.
- Load and Save for original and translated files executes the loading and saving of individual files representing original and translated files.
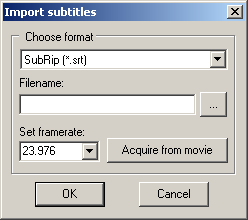
- Import/Export subtitles pop-up a dialog window, asking you to choose the format you want to import/export to, the file from/where you do the import/export and the framerate your video file is. When you have a video file loaded, you can also acquire this information from the video file itself, pressing the Acquire from movie button.
- On the Edit menu we find a group of four functions regarding subtitles: Insert, Remove, Merge and Divide and also expert functions and Cut-Copy-Paste lines functions.

When the subtitle is in edit state, using the above functions you can Insert a line before the selected line, Remove the selected line, Merge the selected lines or Divide the line in two. To merge two or more lines you must select them using the shift key and the arrow keys or page up-down keys or your mouse. To divide a line in two the line must contain the line separator sign ď|Ē to do so. On the expert mode you find the same functions, but with some additional options, including the number of lines to insert, delete and about placing them before or after the selected line.
Warning: on the expert mode, modifications you made are applied only on the selected subtitles. That means that there is no longer a correspondence between the lines of the original and translated subtitle, one of them is moving up or down. So, the content of the line in the original file is not the one to be translated on the edited line in the translated file.
Cut-Copy-Paste lines do exactly what their name say but do that on multiple lines. Here is important what columns do you select. Selecting just the text column will copy onto clipboard just the text, but if you select the start frame and end frame columns also, you will add to clipboard those columns. If you paste-it in Notepad, for example, you will end up with a MicroDVD-like subtitle. Multiple line selection can be made using the mouse, not only the cursor.
The Renumber Frame Numbers function pop-up a dialog box:
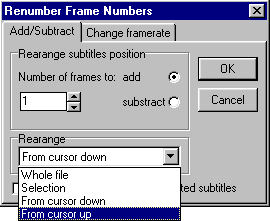
Here you can modify the number of the frames of the lines, by adding or subtracting, on the whole file, selected range, from cursor down or up. On the second label named Change frame rate:
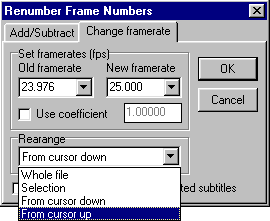
you can change frame rate using standard frame rates or by a coefficient.
The Go to line number function:
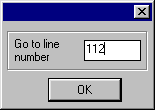
takes you directly to the line number you typed.
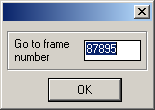
The Go to frame number function is enabled only if movie is loaded. It takes you to the frame you type.
Insert current frame (enabled only if movie is loaded and you are editing the frame number columns) insert in the subtitle the current frame.
- The Search menu help you finding a word in the subtitle, navigate between tags you have placed in the tag column, or search for lines with more characters than you have specified in Configuration->grid visualization or for lines with more subtitle lines than you have specified in Configuration->display subtitles.
- On the Options menu
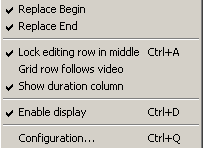
you can find some important functions such as Replace begin and Replace end. Letís make an accolade here. When you open an original subtitle the frames are imported on the translated file automatically. After you open the translated file something is happening, and it goes like this: if the options are enabled, the translated file is not modified, keeping itís frame numbers and, if those options are not enabled the frames on the translated file are modified to be identical with the originalís ones (ST imports only the words not the frames, merging the frames from the original file with the words from the translated file). Is OK to do so when you have a translated file and you want to change the frames with those from another file, more suitable for you. If you have already a well-framed subtitle and you want to make the translation on them enable those functions and the frames wonít get modified.
The Lock editing row in middle function if is enabled keep the row you are modifying on the middle of the window so you can see few lines up and down, helping you understand better the meaning of the sentence if is spread over more lines.
New added feature, Grid follows video, makes the grid to automatically follow up the video if the movie is playing, so your line is always in the middle of the row. Itís easier to follow the subtitle like this when you intend to do a final review before publishing the subtitle.
Show duration column enable or disable the duration column.
The Enable display function enables the display (the movie window).
And we get to the Configuration function and it goes like this:
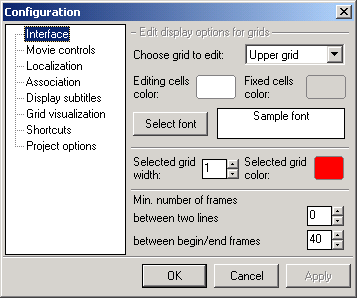
Here you can find some useful functions. Letís start with the Interface. Here you can modify the grid to be the one to be edited, the upper one or the lower one and the font to use in the ST. Note that this option doesnít modify the fonts on the subtitle itself. On the selected grid width and color you can modify the color and the width of the border surrounding the selected grid. And, on the bottom of this dialog box are some useful settings. Minimum frames between lines help you to keep always a number of frames between two lines, in case you have to add some frames on a longer sentence. If, at some point, the ending frame number of one line exceeds the start frame number of the next line the number is highlighted in red. Minimum number of frames between begin/end frames help you keep a minimum of frames between the start frame and end frame of a line so the line can be displayed long enough to be easy to read and understand. If, at some point, the difference between the ending frame number and the start frame number is smaller than the selected value the number is highlighted in red. This option donít modify the subtitle it is only for warning. Suggestion: set the first one at 1 and the second one at the frame rate of the movie, meaning that between two lines it must be left at least 1 frame and the line must be displayed at least one second when playing the movie.
On the Movie controls options:
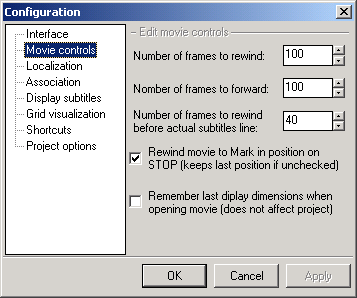
you can modify the number of frames to be rewind or forwarded and the number of frames to rewind when you press the ďrewind before actual lineĒ button.
On the Localization option:
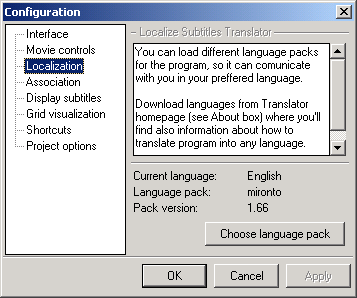
help you select the language you want ST to talk with you.
The Association option:
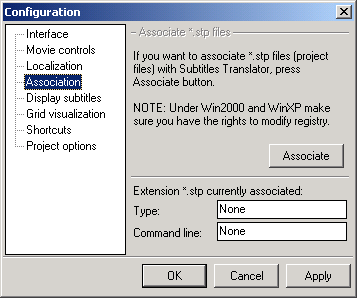
Association option helps you associate the .stp extension with ST.
The Display subtitles option:
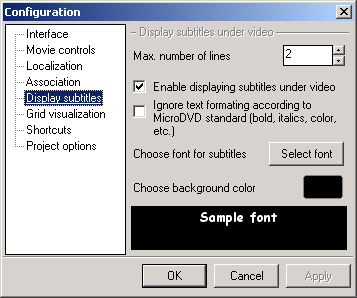
help you select number of lines to be displayed on the movie window and select the font type to be used. This option is for the ST only. It doesnít modify the way your favorite player display the subtitles or the subtitle font itself.
The Grid visualization option:
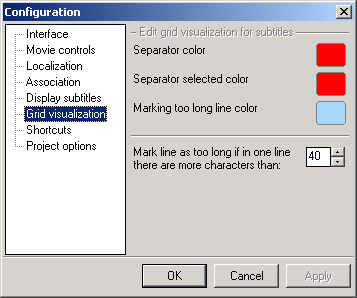
Grid visualization help you to set some visual announcements like changing the color of the separator sign ď|Ē that can be hard to see when is black (between a small L and a caps I for example), and signaling that the line is longer, as number of letters, than an established number you can set (in this example is set to 40 chars on a row). New added feature is to mark a line that has more translation lines than specified in Options->configuration->Display subtitles. This helps you prevent writing a line longer than some players can display or a line that is displayed on the whole movie window (3-4 subtitle lines). Suggestion: 40 characters on a row means that in full screen you can set the font to 22, bold as maximum on an 800x600 display.
The Shortcuts option:
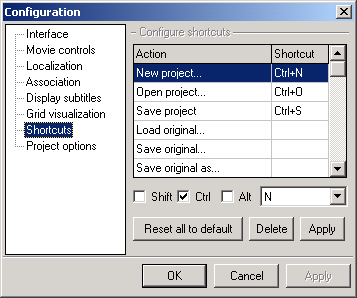
help you reassign your preferred key combinations to the ST functions.
The Project options option:
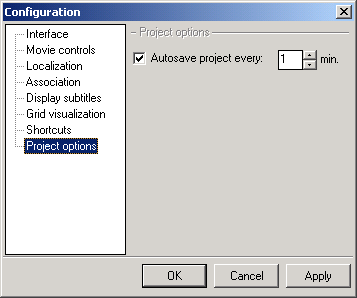
Autosave option give you the opportunity to enable/disable the auto save option. That means that, when specified here, the project is saved every 1 minute (in this case), helping you to not loose work you have done due to a mistake or a computer restart.
Note: this feature works only when using projects!
- V. The Help menu pop up with the contents (a very large and well organized help file) and about (where you can find information about ST and itís creator) menus. On the site you can find also help files for some languages other than English.
|

|
| 4. Additional buttons: |
For a quicker access to the most important commands you can find a large number of buttons.
Here are some of them:

You can find them on the upper side, above the original subtitle window (grid). From left to right it goes like this : New project, Load project, Save project, Move to previous tag, Move to next tag, Load original file, Save original file, and Cut-Copy-Paste lines. The drop-down arrow next to the open icon help you by offering a quick access to the last opened projects. If, at some point you donít have the project listed there or you want to delete the projects already finished, you can edit the translator.ini file (author's note: you don't have to delete the files from the list manualy, as ST checks for the files upon start and if the project file does not exist anymore, it gets erased automaticaly). There, at the end of the file, under the tag ď[RECENT}Ē you can find the path to the projects. Delete the one you donít need anymore.
The second row:

located in the middle of the main window, above the translated subtitle window (grid) goes like this:
Open translated file, Save translated file, Find text, Go To line number..., Move to previous tag, Move to next tag, Insert line, Delete line, Merge selected lines, Divide line, Renumber subtitles and two inactive buttons. The last two buttons became active only if you are editing the frame columns and the movie is loaded. The functions are: Rewind movie before current line and, a very important one, Insert actual frame number in subtitles. It is very useful when you donít have an original subtitle and you start one from scratch. The drop-down arrow located next to Insert a line pop-up with the options of:

helping you inserting line before or after the current row, and also inserting multiple lines. Insert more lines take you to another menu:
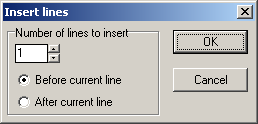
At the bottom we find another row of buttons, icons and a slider.


Beginning from the left we have: Load Movie, Play/Pause Movie, Stop Movie, Rewind, Fast Forward, Move to the selected start Frame, Move to selected end frame (or movie if there are no start and end frame defined), Mark start position, to mark a start position for the movie, other than the first frame, Mark stop position for the movie, other than the last frame, Go to frame number, a small window displaying status of Movie window, a larger window displaying movie status (here movie is Stopped, When playing it plays at a speed of 1,00 x, length of movie is 7016 frames and we are at frame number 0.
Next we see a bar colored in blue representing the volume, the icon of a speaker who enable/disable sound and a drop button, who pops up a menu, helping to select playback speed and to adjust the volume.

The last one is a slider who indicates the progress in movie playing.
At the bottom we find:

the last line of ST. It states about the number of lines your subtitle have, current line (including a number representing how much, speaking in percents, you have translated), the mark-in frame number, the mark-out frame number and the name and location of the project you are working.
|

|
| 5. Subtitles window: |

The first column is the tag column. If on a line you have doubts about the translation click in the corresponding square and a tag will be added. Later, you can navigate between tags. If you close the translator, tags will be saved in the project file, so tags are remembered only when using project mode. The second column is the start frame number. It represents the number of the frame in the movie to start displaying the subtitle line. The third column is the end frame number. It represents the number of the frame in the movie to end displaying the subtitle line. The fourth column displays the length of the line, in frames. This is the number of frames the line will be shown when you play the movie. But if you insert here a number, considered by you to be the best length for a line to be displayed the end frame number will be auto-calculated in agreement with this value. And, at last, the fifth column is the subtitle itself column. In this line you must write the translation of the line in the original file. On the top you have the path to the file you are editing, in this case the drive is E:\ and the file is dmt-xvid-monster.txt, located in the root pf E: drive. If you havenít made modifications by inserting lines in subtitle, the line you are editing on the lower grid corresponds to the original file on the upper grid (highlighted), like this:
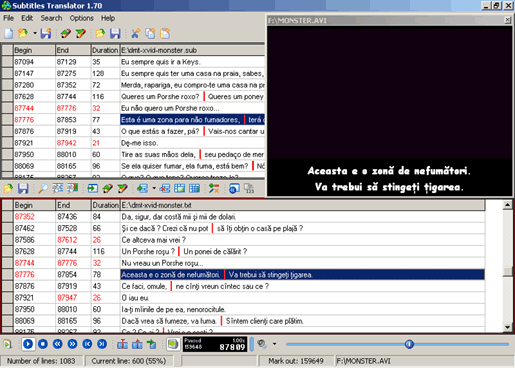
Donít worry, the spaces between the line separator and the end/beginning of words is only for the purpose of seeing better the line separator. They donít appear actually in the subtitle and are not counted as characters in the line length.
|

|
| 6. Using Subtitles Translator: |
I consider that there are two ways to use ST, the ďprojectĒ way and the ďindividual filesĒ way. The difference is in the way you open the files, not in the functionality.
- Letís start with the project way. First you must create a project, using the new project function. Be careful where the files are located ! When the translated file is created the start frame, end frame numbers and the brackets are imported directly from the original file.
After creating a project you can start translating the subtitle file. On the upper grid (original subtitle) you can see the lines of the original subtitle and on the lower grid (translated subtitle) youíll find the empty lines of the translated subtitle. Now is a good moment to save the project.
Done ? OK, letís start translating. Click on the lower grid. The row will be centered by the program (if the lock editing row in middle is enabled) so on the upper grid you can see the original file with the line to be translated centered and highlighted. Start the movie, listen to the dialog if you need and write the translation, using the original file and, if you need so, the sound from the movie. If the movie frame is located between the frames marked at the beginning of the line you should see the translation displayed on the movie window. If you click on the upper grid the original subtitle is displayed on the movie window. When you finish typing a line, press enter key. You will be moved automatically to the next line. If there is something on that line that requires later attention you can go on the first column and add a tag. Later you can navigate between tags. If you need to hear again the dialog to clarify the meaning of the sentence press the Rewind before current line button. It is very helpful. When you finished working save the project.
Why is important to work with projects ? Saving project on the last edited line get you on the same point when loading the project, so you donít have to scroll the subtitle or forward the movie.
If some lines are enlarged as number of words when you translate you can modify begin or end frame number by editing them manually or by pressing the Insert actual frame number in subtitles button.
If the enlargement is greater use the divide line option. Do the same thing on the original file so you can keep correspondence between the lines. If the original file have very short lines, displayed only for a second or less, it is better to merge the lines.
- The individual files work the same way but it is not necessary to load the movie (e.g. you donít have it) or the original file (same reason as movie).
When you finish the work remember to save the file you modified!!! ST will prompt you to do that anyway.
|

|
| 7. Tips and tricks: |
- If you want to create a new subtitle, load the movie and, when you watch it, press the Insert actual frame number in subtitles button (automatically frame number is inserted and the editing column is modified so you can press the button again for the end line frame number) listen the dialogue, press the Insert actual frame number in subtitles button for the end of line to be displayed, do the translation and start all over again with the next sentence.
- Keep in clipboard the line separator so you can paste it when needed.
- Learn the shortcut keys. You can work faster with them instead of the mouse.
- Remember, as long you havenít leaved the line, you can restore modifications you have made using the ďUNDOĒ command by pressing the combination Ctrl+Z. This option doesnít work if you have leaved the line already. Donít reassign this shortcut!
- Other useful shortcuts are Ctrl+C, Ctrl+X, Ctrl+V. Remember them from all Windows applications ? A good thing to do is also to not reassign them. Last, but not least, Shift+Enter is a very useful shortcut to copy the content of a line from the original subtitle straight to the translated one, without using the clipboard.
For bugs, things that I forgot to mention and mistakes on this file you can mail me to: adi_cotorogea@yahoo.com
For more help on using ST go on the Forum at: http://www.mironto.sk
|

|
|
 |
 |
 |
Movie player with
subtitles support
 |
 |
|

|
 |
